Building a custom wireless registration system with Linux
by Alex Fedosov
This document describes how to create a Linux-based Access Point that
supports wireless device registration. That is, users must authenticate
themselves in order to make use of the wireless network. This
authentication only has to be done once and the system will subsequently
remember the user's MAC address.
Some familiarity with Linux, system administration, and
iptables is assumed on the reader's part. Furthermore,
it would help to know HTML and Python if you would like to modify the
provided scripts.
|
We use network registration in our labs. Our students bring their laptops
with wireless devices so they would like to access the wireless network.
I was looking for a system with a following features:
- Only use network registration for wireless devices, not for wired
- Only allow authenticated users to use the network (sorry, random people
from the street.)
- Require a one-time registration
- Do not use fake DNS/DHCP scheme (i.e. use existing DHCP and DNS)
- Do not require reboot or DHCP refresh after registration
There aleady exists a network registration system, called NetReg. However, it has some
shortcomings, notably the last points above are what I disliked about
Netreg. It uses the shared network feature of the DHCP server to give out
"fake" 192.168.x.x IP addresses to unknown clients and real IP
address to registered clients.
The problems here are that:
- The network traffic is not isolated so an unregistered person can still
sniff the packets
- Knowing the IP address range in use on the network, one can still
assign a real IP address manually to their device and bypass the
registration system.
- Additionally I never liked the fake DNS/DHCP approach. We already have
a DHCP and DNS servers on our network, why set up additional ones, that are
fake to boot?
As a solution, I decided to build my own system that I dubbed NetGreg.
NetGreg attempts to solve the above problems: rather than using fake DHCP and
DNS servers, it employs iptables for access control and works the following
way:
- iptables is used to permit unregistered devices access to DHCP and DNS
servers. (i.e. they obtain a valid IP address)
- iptables drops all other traffic from unregistered MAC addresses to
prevent them from accessing the network
- The only packets allowed to pass through are http traffic which is
redirected to the local web server. (No matter what web site the user will
go to, they will end up on the registration page.)
- User is authenticated by making sure they can ssh to a given machine.
(Other authentication methods can be used -- PAM or LDAP, for instance. SSH
seems to be the easiest and most secure.)
- Authenticated users' MAC addresses are saved and all the traffic from
them is allowed to pass through.
- Because there is a transparent firewall in place between wired and
wireless networks, sniffing the network will only reveal traffic of the
other wireless users. (Arguably, this is still bad, but at least the
servers and other important systems are protected.)
- Giving yourself a static IP will no longer work because access control
is done via iptables, not DHCP server.
First, you need some hardware:
- Any old (or not so old) PC (small form factor is cooler!)
- Wired network card (built-in or PCI card)
- Wireless network card (I used an SMC 802.11g PCI card)
You should be able to use any old 802.11b card as well, if you are willing
to accept less bandwidth. (Of course you'd need a different driver --
hostap is the best bet, so get a Prism card supported by that driver,
if you are going that route.)
If you are using a computer with PCMCIA support, there is no reason why a
PCMCIA card won't work instead of a PCI card. For that matter, any hardware
supported by prism54 should work fine. (As far as I know, hostap and
prism54 are currently the only Linux drivers that support "Master" (i.e.
being an Access Point) mode, so choose your hardware accordingly.
Then, you need to have the following packages installed:
- Linux 2.6.5+ (includes prism54 driver in the kernel)
- Python 2.2+
- iptables 1.25+
- Apache Web Server
You may be able to get away with Linux 2.4, however, 2.6 has better support
for Ethernet bridging (which is what I am using) and includes the prism54
driver in the kernel. (You would have to install it separately with for 2.4
kernel.) You also need a recent version of iptables that includes support
for bridging. (e.g. physdev match extension).
It is a good idea to start with a distribution that already includes all
the above software -- I used Fedora Core 2.
| Short version for the impatient |
- Rebuild your kernel (here is my .config
file -- adjust as needed)
- Configure the wireless card for Master mode
- Bridge wireless and wired network interfaces
- Set up iptables to redirect unknown users to local web server
- Set up a web page and scripts to verify users
- Try it out!
| Configuring the wireless card |
In order to use the prism54 driver under Linux, you need to obtain
the firmware for your card. Download it from the Prism54 site (I got the one named
isl8390) and place it in the
/usr/lib/hotplug/firmware directory. Now you should be able to
bring up the wireless interface and get connectivity.
Prism54 makes it very easy to set up your Linux box to become an Access
Point. All you really have to do is (replace eth1 with your wireless
interface name):
# iwconfig eth1 mode Master
Then assign yourself an ESSID:
# iwconfig eth1 essid myessid
| Bridging wireless and wired interfaces |
To set up bridging, we use the brctl utility. Make sure you
installed the bridge-utils package or obtained it in some
other ways. First, we create a bridge interface:
# brctl addbr br0
Then we add both interfaces to it:
# brctl addif br0 eth0
# brctl addif br0 eth1
That's it! Now assign an IP address to it, bring it up, and make sure you
have connectivity. You should create an ifcfg-br0 config file
in /etc/sysconfig/network-scripts which will allow you to use
the ifup and ifdown scripts. (On RedHat and
compatible distributions. YMMV.)
NOTE: I discovered that before you can add the wireless interface to the
bridge and even put the wireless interface in Master mode, you have to load
the firmware. The easiest way to accomplish this is to bring up the
wireless interface without assigining an IP address to it, which will
trigger a firmware load:
# ifconfig eth1 up
|
So to automate this all, here is a script
(that should be called from rc.local) that triggers the
firmware load, puts the card in Master mode, creates and brings up a
bridge (basically the above three steps). This seems to be the cleanest
solution, as I was not able to accomplish the same with the RedHat/Fedora
network scripts.
At this point, you should have a functioning Linux-based access point that
should allow access to everybody.
The next thing we need to do is set up iptables so that it
allows wireless access to registered MAC addresses, and denies access to
non-registered MACs (but allowing them to register.)
First, we create some basic iptables rules:
- allow all traffic for established connections
$iptables -t filter -A FORWARD -m state --state ESTABLISHED,RELATED \
        -j ACCEPT
$iptables -t filter -A INPUT -m state --state ESTABLISHED,RELATED \
        -j ACCEPT
- allow any incoming connections from hard-wired interface
# allow connections from hard-wired interface
$iptables -t filter -A INPUT -m physdev --physdev-in eth0 \
        -m state --state NEW -j ACCEPT
- allow incoming connections to the http server
# allow connections to httpd
$iptables -t filter -A INPUT -p tcp --dport http \
        -m state --state NEW -j ACCEPT
$iptables -t filter -A INPUT -p tcp --dport https \
        -m state --state NEW -j ACCEPT
- forward DNS and DHCP traffic
# allow DNS to pass through
$iptables -t filter -A FORWARD -p tcp --dport domain -j ACCEPT
$iptables -t filter -A FORWARD -p udp --dport domain -j ACCEPT

# allow DHCP to pass through
$iptables -t filter -A FORWARD -p udp --dport 67:68 -j ACCEPT
- set default input and forward policies to DROP
# default policies for the main (filter) table
$iptables -t filter -P INPUT DROP
$iptables -t filter -P OUTPUT ACCEPT
$iptables -t filter -P FORWARD DROP
At this point you should have a locked-down access point that lets all
wireless clients get DHCP addresses, but does not allow any other wireless
traffic through, except for connecting to the local HTTP server.
Now, we need to create rules for somehow identifying registered MAC
addresses and allowing their traffic to pass through. Assuming we have a
file /tmp/known_macs that contains a list of registered
MAC addresses, we can read that list into a variable with
KNOWN_MACS=`cat /tmp/known_macs | awk '{print $1}'`
Now, the trick we are going to use to recognize packets from known MAC
addresses is this: we are going to match packets based on MAC address
in PREROUTING chain of the mangle table (basically the first entry point of
the packet into the system) and we will "mark" it using iptables MARK target.
# mark all the packets from the registered MACs
for MAC in $KNOWN_MACS ; do
        $iptables -t mangle -I PREROUTING -m mac --mac-source $MAC \
                 -j MARK --set-mark 0x42
done
Any packets that have been marked should be allowed to pass through the
FORWARD chain of the main filter table and through the PREROUTING chain
without applying any other rules. We can match our previously-set mark
using iptables mark extension:
# do not apply any rules to packets that have been marked (i.e. known MACs)
$iptables -t nat -A PREROUTING -m mark --mark 0x42 -j ACCEPT

# forward any packets that have been marked (i.e. know MACs)
$iptables -t filter -I FORWARD 1 -m mark --mark 0x42 -j ACCEPT
Finally, any traffic from unknown MACs that attempts to go to port 80
should be redirected to local web server for registration. This we can
accomplish with the REDIRECT target:
# redirect HTTP requests from unknown MACs to local machine
$iptables -t nat -A PREROUTING -m physdev --physdev-in eth1 \
        -p tcp --dport 80 -j REDIRECT
The complete script (with some extra things added in, like logging) is
available here. At this point you should have
a functional access point that allows traffic from all MACs listed in
your known_macs file (well, probably nobody at this point)
and redirects everyone else's http traffic to the local web server.
Of course, there is nothing on the web server yet, and that's what we will
take care of next.
| Setting up the web pages and scripts |
It is up to you to design the web page as you like it. What really matters
is how you authenticate users to make sure they are allowed to use the
wireless network. In our case, if a user is not known, any URL he or she
types into their browser will take them to the following page: (see live
demo here)
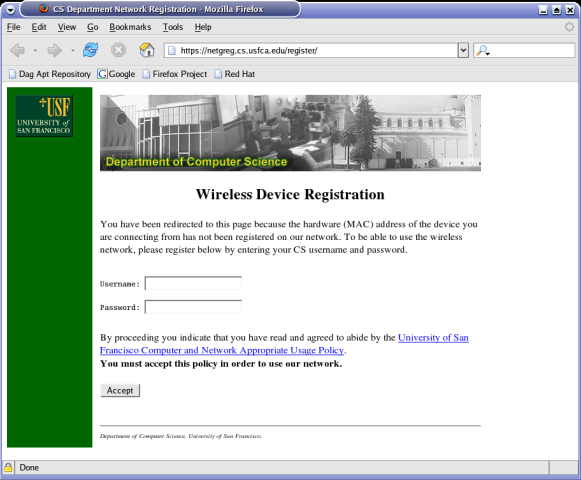
At this point the user must enter his or her password which gets verified
by the CGI script which gets launched when the user submits their
information.
Our script attempts to ssh to a machine on which the user would
have an account. If the connection is successful, the script finds the
user's MAC address and adds it to the known MAC table. (e.g. the
known_macs file.) Note: Make sure your known_macs
file is owned by apache (or whatever user your webserver runs
as), since the script will be writing to it.
Here are the two scripts: ssh.py is the module
that performs account verification and
register.cgi
is the main script. Adjust the scripts as needed, stick them in your
cgi-bin/ directory, and you are ready to go!
Note: the ssh.py module relies on two other packages to handle
the actual SSH connection:
You can also download a tarball
of all the files.