Large projects require more than one developer and, hence, multiple programmers will be modifying the same files, adding files, and deleting files all on the same code base. Even with revision control, developers cannot be checking code in and out of the same code base because changes needed by programmer X will break programmer Y's code.
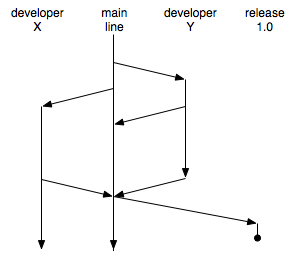
The obvious solution is to give each programmer their own complete "playground" or "sandbox" in which they can modify anything they want. The question is, how do you prevent the project from splintering into n different projects instead of a single project? The answer lies in a revision control system's ability to do branching and merging. Branching is essentially a cp -r from the main line code to a separate location, a development branch. Merging is just "pinching" the development branch back into the mainline. Perforce, the system we use, is known for its excellent branching and merging capabilites. The following image depicts a two-programming development team with the main line representing normal perforce operation (w/o branching).
Developer Y begins development by branching any existing files and then later merging the branch back in twice before discontinuing development. Developer X begins development after Y but starts with the same initial code line, ultimating merging at a release point with Y's code.
The "release 1.0" branch is a terminal line that simply represents a complete snapshot of the software for a release. Note that you might actually have multiple release candidates on this one line such as "1.0rc1", "1.0rc2", etc... Bugs fixed in the main line would be pushed to the release branch from which the release candidate would be cut.
What happens when there are collisions such as "programmers X and Y both updated Main.java". If their changes do not overlap in the file, perforce can safely resolve the conflict. You will see more about conflict resolution below as it is a bit tricky and must be done properly in order to maintain software integrity.
Each developer will have their own branch in which to play. You start a new development branch by creating a new branch specification, creating a new client spec that maps that branch to your disk, and integrating the main line into your branch. Typically, you will see branching on the local disk as a directory structure like the following:
~/depot
    main
        src
        lib
        doc
~/depot
    dev
        X
           src
           lib
           doc
        Y
           src
           lib
           doc
~/depot
    release
        1.0
           src
           lib
           doc
Branch specs are just maps from one place in the depot to another place in the depot. In our case, you will see for your dev branch userid.dev:
...
View:
	//depot/cs342/groupN/main/... //depot/cs342/groupN/dev/userid/...
Note that the branch spec name doesn't include nfs or any other machine reference as it's a depot-to-depot mapping. You just need a name that uniquely indicates what the branch is for.
Main exists already so you will not have a branch spec for main (though you will have client specs for both main and your dev branch).
Create a branch spec with
p4 branch userid.dev
which will bring up an editor. Change the View field to the above (with your userid changed appropriately).
For each dev branch, you will have a branch spec and different client spec so that perforce can prevent you from modifying the main line when you think you are modifying your dev branch. Because your current client, userid.nfs, works with //depot/cs342/userid and not your group-shared files, you will need two completely new client specs named userid.main.nfs and userid.dev.nfs:
Client: userid.main.nfs

Root:   /home/userid/depot/main

View:
   //depot/cs342/groupN/main/... //userid.main.nfs/...
and like this for your development branch.
Client: userid.dev.nfs

Root:   /home/userid/depot/dev

View:
   //depot/cs342/groupN/dev/userid/... //userid.dev.nfs/...
Pay close attention to the file mappings.
You always make a uniquely rooted client. Never never ever have roots from more than one client map to a single local drive directory! Perforce will get very confused.
Create the client specs with
p4 client userid.main.nfs
and
p4 client userid.dev.nfs
The editor will come up and you must change the Root and View fields appropriately.
I have set up the protections as follows so that only members of a group can see underneath a group's subdirectory:
write group groupN * //depot/cs342/groupN/...
where the groups are defined with the appropriate members such as:
$ p4 group -o groupN
...
Users:
        cfrasche
        defendio
        illim
Just as with the nonbranching use of perforce, we will use a .p4 file to inform perforce of our intended branch and user etc... You must have file /home/user/depot/.p4 with the following info:
P4USER=user
P4PASSWD=
P4PORT=dweller:1666
at least and then either
P4CLIENT=userid.main.nfs
or
P4CLIENT=userid.dev.nfs
For perforce to know to look in this "hidden" file (due to the prefix of a dot), you must have
export P4CONFIG='.p4'
in your .bash_profile or whatever.
If you have your .p4 file set to use client userid.dev.nfs, then when you try to "p4 edit File.java" in the main line, it will tell you that that file is not under your client mapping or something to that effect. To switch branches, just change your .p4 file.
Tell perforce to perform the actual branch. This is like doing a "p4 add" on all the newly branched files and copies all the stuff from main into new branch dir on your drive. You must have set your client to be your userid.dev.nfs client to be able to alter it.
p4 integrate -b parrt.dev
Now, commit the branch:
p4 submit
At this point, you can do edits and so on in this branch w/o worrying that someone is modifying files underneath you. Proceed with normal development and testing.
Sometimes bug fixes will appear in the main line that you would like in your development branch. To get them, just do another integrate, but you will need to resolve any differences. If the bug fix from main is not in any file you've modified, you will be able to just "p4 submit" immediately to get the fix locked into your branch. If your branch and the main branch have altered the same file or files but not in the same location of the file(s), a
p4 resolve -as
command will "accept safe" resolves such as this. Then do a normal "p4 submit". If you do a submit and get an error about needing to resolve, you must do a
p4 resolve
and then interactively indicate what to do with each file. More on this later.
Nothing is ever submitted to the mainline that has not been compiled and tested with your standard unit tests otherwise all development branches will become corrupted with junk that will not compile or execute properly.
You should follow this strict process for merging changes back into the main line to cut releases and do integration testing etc...
p4 sync # make sure you client has dup of depot; VERY important step
p4 integrate -b userid.dev.nfs # grab files from main that have changed
p4 resolve -as  # if nothing conflicts, this "safe" resolve just works
                # You will have to do "p4 resolve" after this for conflicts
		# that -as couldn't handle automatically.
p4 resolve      # find out what didn't resolve
p4 submit       # commit transaction
p4 integrate -r -b parrt.dev # reverse the branch direction
p4 resolve -as		     # safe resolve
p4 resolve		     # find out / fix what didn't resolve
p4 submit
To cut a release, just create a branch spec such as webmail-1.0 that maps
View:
  //depot/cs342/groupN/main/... //depot/cs342/groupN/release/webmail-1.0/...
Then do
$ p4 integrate -b webmail-1.0
$ resolve -as
$ p4 submit
The diff3 process is fundamental to branching, merging as it dictates how two different versions of same file are different relative to a starting version. Imagine T.java:
public class T {
        int x;
}
and then parrt does this:
public class T {
        int x;
        public T() {
                x=3;
        }
}
and tombu does this in his branch:
public class T {
        int x = 3;
}
Now, they want to merge there results back together. diff3 figures out how they differ relative to first T.java:
$ diff3 T-parrt.java T.java T-tombu.java
====
1:2,5c
        int x;
        public T() {
                x=3;
        }
2:2c
        int x;
3:2c
        int x = 3;
diff3 can show all sorts of things need by a branch/merge tool:
$ diff3 --overlap-only T-parrt.java T.java T-tombu.java
2,5c
        int x = 3;
.
In this section, I demonstrate the basic processes to create branches and do some simple merges.
Assuming I am a member of the "black" team, I would create the following main client spec:
$ p4 client parrt.main.nfs
...
Root:   /home/parrt/depot/cs342/black/main

Options:        noallwrite noclobber nocompress unlocked nomodtime
normdir

LineEnd:        local

View:
        //depot/cs342/black/main/... //parrt.main.nfs/...
To work in my dev branch I create a /home/parrt/depot/cs342/black/.p4 file:
P4CLIENT=parrt.main.nfs
P4USER=parrt
P4PASSWD=...
P4PORT=dweller:1666
Note that if I try to go into a directory not under my client's root, you'll get an error:
[parrt@nexus parrt]$ pwd
/home/parrt/depot/cs342/black/dev/parrt
[parrt@nexus parrt]$ p4 add foo
Path '/home/parrt/depot/cs342/black/dev/parrt/foo' is not under
client's root '/home/parrt/depot/cs342/black/main'.
Map the main line to your dev branch area:
$ p4 branch parrt.dev
...
View:
        //depot/cs342/black/main/... //depot/cs342/black/dev/parrt/...
Also I will need following client spec to handle my dev branch:
$ p4 client parrt.dev.nfs
...
Root:   /home/parrt/depot/cs342/black/dev/parrt

Options:        noallwrite noclobber nocompress unlocked nomodtime
normdir

LineEnd:        local

View:
        //depot/cs342/black/dev/parrt/... //parrt.dev.nfs/...
Note that I am making the Root as explicit as possible.
To work in my dev branch I create a /home/parrt/depot/cs342/black/.p4 file:
P4CLIENT=parrt.dev.nfs
P4USER=parrt
P4PASSWD=...
P4PORT=dweller:1666
I'll create an A.java file
public class A {
        int i;
}
and then add to the main line in the depot (since my client is set to parrt.main.nfs):
[parrt@nexus main]$ vi A.java
[parrt@nexus main]$ p4 add A.java
//depot/cs342/black/main/A.java#1 - opened for add
[parrt@nexus main]$ p4 submit
Change 780 created with 1 open file(s).
Submitting change 780.
Locking 1 files ...
add //depot/cs342/black/main/A.java#1
Change 780 submitted.
Remember that only changes that have been submitted will be available to push to dev branches.
Change your .p4 file so it points to the dev client.
[parrt@nexus main]$ grep CLIENT ~/depot/cs342/black/.p4
P4CLIENT=parrt.dev.nfs
Then integrate the branch:
[parrt@nexus main]$ p4 integrate -b parrt.dev
//depot/cs342/black/dev/parrt/A.java#1 - branch/sync from
//depot/cs342/black/main/A.java#1
[parrt@nexus main]$ p4 resolve -as
No file(s) to resolve.
[parrt@nexus main]$ p4 submit
Change 781 created with 1 open file(s).
Submitting change 781.
Locking 1 files ...
branch //depot/cs342/black/dev/parrt/A.java#1
Change 781 submitted.
Afterwards you will see A.java in the dev branch:
[parrt@nexus main]$ pwd
/home/parrt/depot/cs342/black/main
[parrt@nexus main]$ cd ../dev/parrt
[parrt@nexus parrt]$ ls
A.java
If you try to create the dev branch when still set to the main client spec, you will see this error:
[parrt@nexus main]$ p4 integrate -b parrt.dev
No target file(s) in both client and branch view.
First, let's add a B.java file to the dev branch:
[parrt@nexus parrt]$ vi B.java
[parrt@nexus parrt]$ p4 add B.java
//depot/cs342/black/dev/parrt/B.java#1 - opened for add
[parrt@nexus parrt]$ p4 submit
Change 782 created with 1 open file(s).
Submitting change 782.
Locking 1 files ...
add //depot/cs342/black/dev/parrt/B.java#1
Change 782 submitted.
and then make a change to the A.java we got from main line:
[parrt@nexus parrt]$ p4 edit A.java
//depot/cs342/black/dev/parrt/A.java#1 - opened for edit
[parrt@nexus parrt]$ vi A.java
[parrt@nexus parrt]$ cat A.java
/** A comment */
public class A {
        int i;
}
[parrt@nexus parrt]$ p4 submit
Change 783 created with 1 open file(s).
Submitting change 783.
Locking 1 files ...
edit //depot/cs342/black/dev/parrt/A.java#2
Change 783 submitted.
Notice that my .class files are not kept in the depot.
Following the steps above for merging:
[parrt@nexus parrt]$ p4 sync
File(s) up-to-date.
[parrt@nexus parrt]$ p4 integrate -b parrt.dev
All revision(s) already integrated.
[parrt@nexus parrt]$ p4 resolve -as
No file(s) to resolve.
[parrt@nexus parrt]$ p4 submit
No files to submit from the default changelist.
Since nothing changed in the mainline, this operation did nothing.
I switch my .p4 to client spec parrt.main.nfs and then check with p4 info:
[parrt@nexus parrt]$ p4 info
User name: parrt
Client name: parrt.main.nfs
...
Now reverse the branch
[parrt@nexus parrt]$ cd ~/depot/cs342/black/main
[parrt@nexus main]$ p4 sync
File(s) up-to-date.
[parrt@nexus main]$ p4 integrate -r -b parrt.dev
//depot/cs342/black/main/A.java#1 - integrate from
//depot/cs342/black/dev/parrt/A.java#2
//depot/cs342/black/main/B.java#1 - branch/sync from
//depot/cs342/black/dev/parrt/B.java#1
[parrt@nexus main]$ p4 resolve -as
/home/parrt/depot/cs342/black/main/A.java - merging
//depot/cs342/black/dev/parrt/A.java#2
Diff chunks: 0 yours + 1 theirs + 0 both + 0 conflicting
//parrt.main.nfs/A.java - copy from
//depot/cs342/black/dev/parrt/A.java
[parrt@nexus main]$ p4 resolve
No file(s) to resolve.
[parrt@nexus main]$ p4 submit
Change 784 created with 2 open file(s).
Submitting change 784.
Locking 2 files ...
integrate //depot/cs342/black/main/A.java#2
branch //depot/cs342/black/main/B.java#1
Change 784 submitted.
One point of confusion with perforce concerning branching: their use of relative pronouns yours and theirs such as in:
Diff chunks: 0 yours + 1 theirs + 0 both + 0 conflicting
Just think of yours as the current branch (or main) and theirs as the branch you are pulling from. So when we merged my dev branch back into main, yours implies "main line" and theirs implies "my dev branch" because I am using my main client spec not my dev branch client spec.