Quick and Dirty Guide:
Creating a Model, Rigging it, and Creating Animations in Blender,
then Exporting to and Viewing in Ogre
Step 1: Create a Model
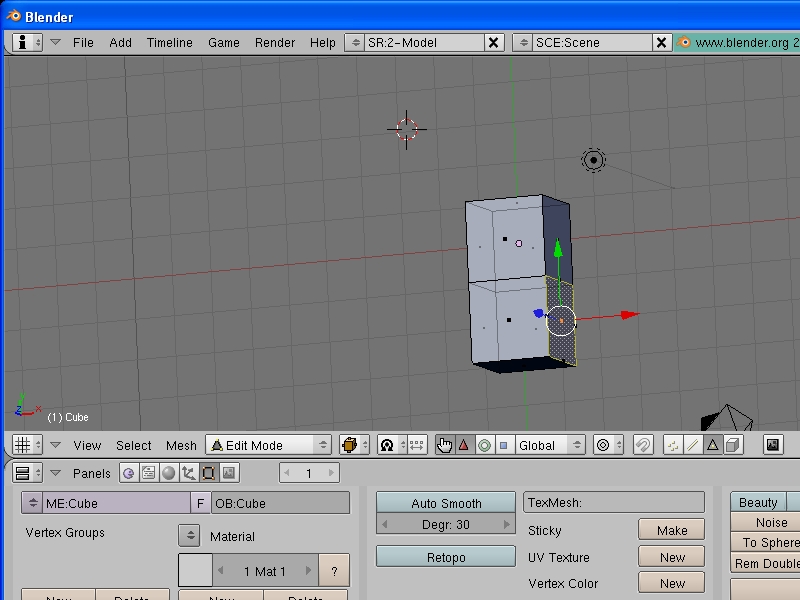
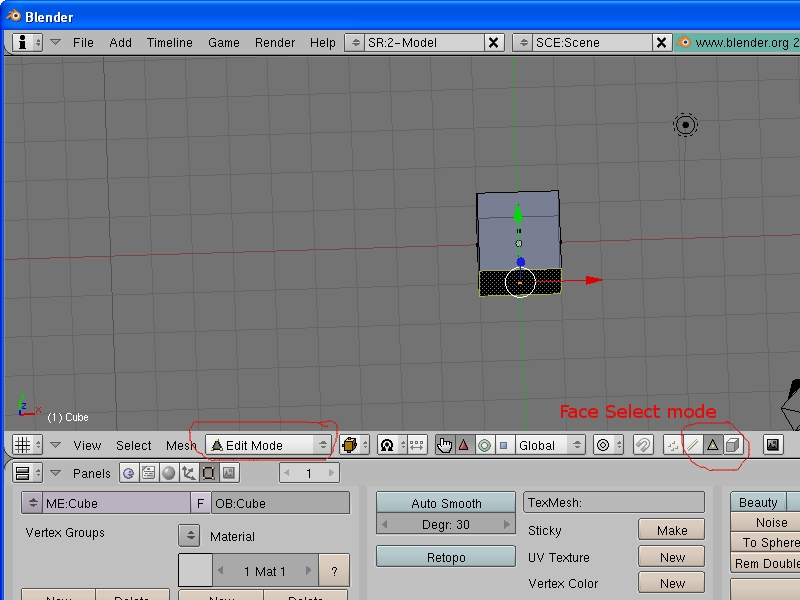
First, we will create a model to animate in Blender. Start with the standard blender cube. Switch to edit mode and face select mode and select the bottom face of the cube, by right-clicking on it:
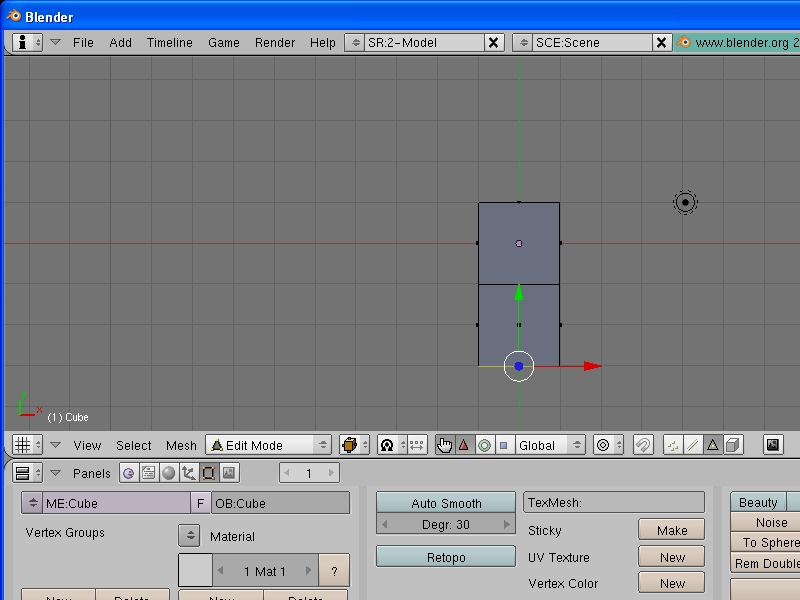
Press Numpad 7 to get a head-on view of the cube, and then press e to extrude the face. After extrududing the face, press 2 to move the extruded face two units along the normal, and then press return to confirm the new location of the extruded face. Instead of pressing 2 and return, you can instead move the extruded face around using the mouse, and confirm the final location using the left mouse button.
Note that if you click the right mouse button instead of the left
mouse button, you will undo the relocation of the extruded face, but
you will not undo the extrude step -- there will be two faces right on
top of each other -- which would cause problems for the Ogre
exporter
Rotate the view a bit (by dragging with the middle mouse button held down) so you can select another face (remember -- selection is done with the right mouse button):
Press e to extrude this face, and then press 2 (or use the mouse) to move the extruded face, and then hit return (or the left mouse button) to accept the new location of the extruded face. Repeat the process, pressing e to extrude, and then 2 to move the new extruded face along the normal, until you get:

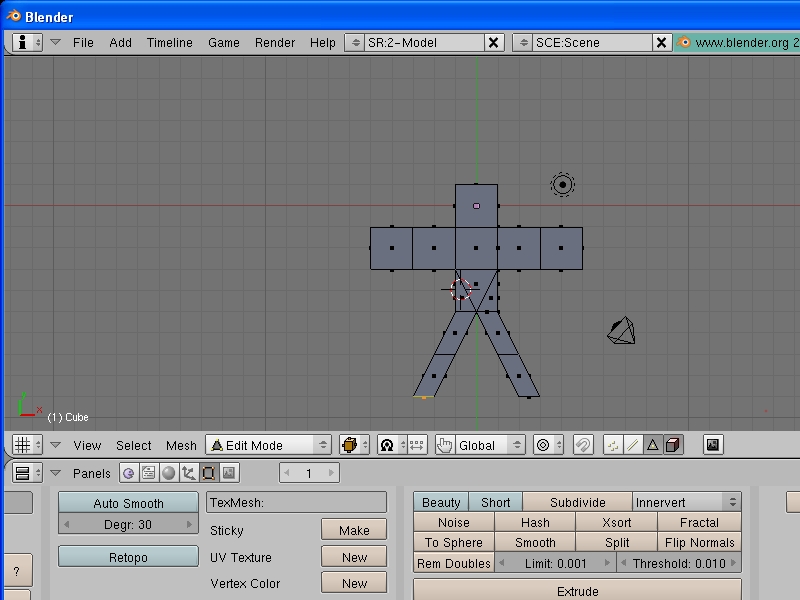
We now have the beginnings of a character: A head an a left arm
(assuming we are looking at the front of the character). Repeat
the extruding process to give our character a right arm and a torso.
(Using the number pad -- Num 7, Num 1, Num 3 -- to change views
can be helpful here -- be sure that numlock is on!). Once we
have a bit more of our character done, select the bottom of
the torso, and press the subdivide buton in the buttons window to give
the bottom of the torso a few more faces:

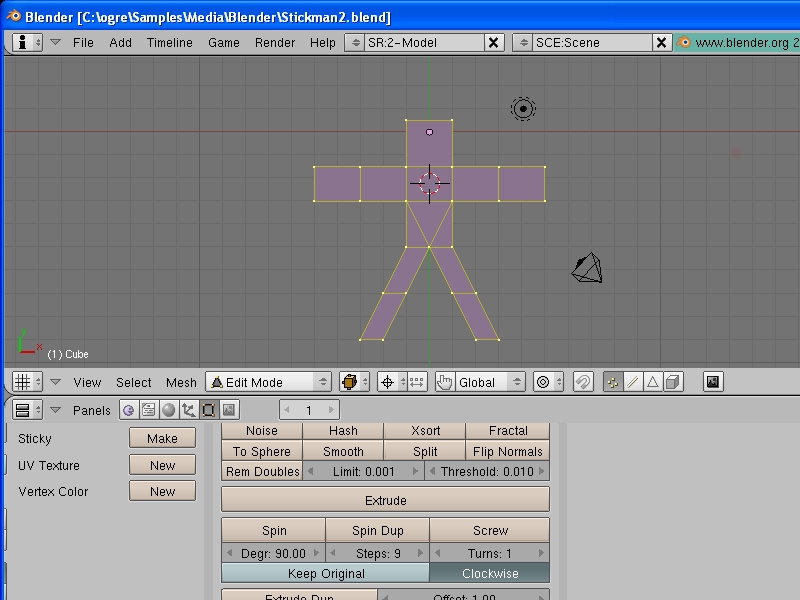
Select the two squares on the character's left, bottom torso, press e to extrude, select "extrude region" from the pop-up menu, and press 2 to move the faces down, and then return to confirm the move.

We'll want the legs to be apart a bit, so while those two faces are still selected, press g (for grab), then x (to translate along the x axis), and then 1 (to move over 1 along the x axis), and then the return key (to confirm the move).

Using the same method, extend the left leg down another segment, and then repeat to get the right leg:
We've got sligtly funny-looking arms now -- they look a little too tall
We can switch to edge select mode (or vertex select mode), and
move around some edges (or vertices) to make our model look a little
better.
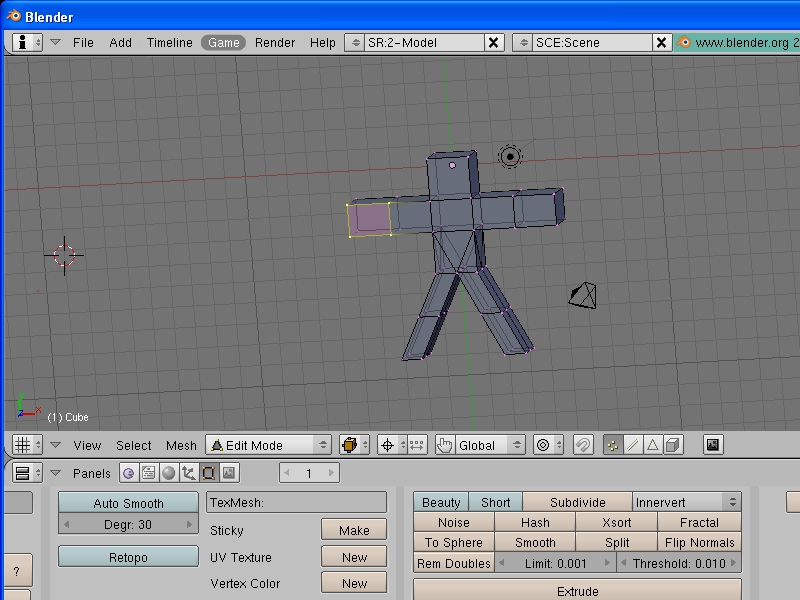
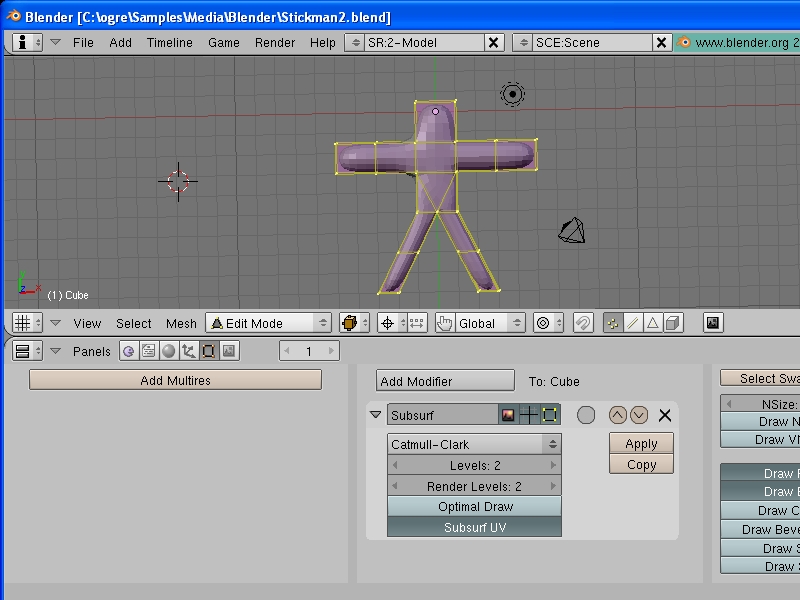
If we want our model to look much better, we can always use a subsurface modifier to make it nice and smooth:
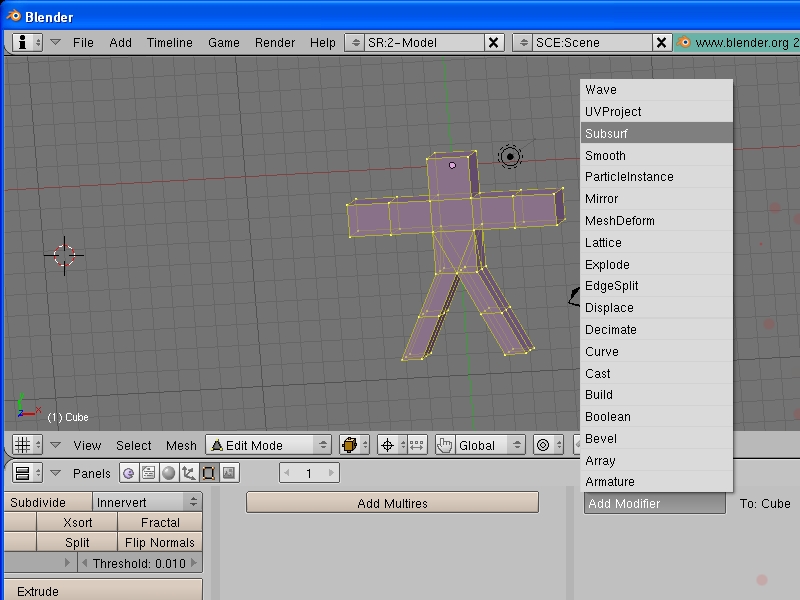
Once we have a subsuf modifier, we can change the levels, to add more vertices.
Note that you are not actually changing the mesh, you are just changing
how blender renders the mesh -- so Ogre won't see the fancy new mesh,
it will see the old, blocky mesh instead. (Note that in edit
mode, we can see both the blocky mesh and the pretty mesh superimposed
on each other). Now, we can replace the old. blocky mesh with a
nice, smooth mesh that ogre can handle, by changing to object mode, and then pressing alt-c
(to convert modifiers to mesh -- that is, create a new mesh based on
the current modifiers) When we convert the mesh, we can either
keep the old mesh or replace it. However, you may want to first
texture the object before replacing the mesh with the new, complex mesh
(since it may be easier to texture the old mesh than the new, more
complicated mesh.)
To make our lives a little easier, however, we will not use the
subsurface model that contains many extra polygons -- instead, we will
just rig and animate our simple mesh.
Step 2: Texturing
(Appologies for the lack of screenshots here). Since we're being
quick and dirty, we'll just use a built-in Ogre texture. Open up
the UV editor, select all of the faces, and open an arbitary image -- I
used the Rockwall that came with the Ogre distribution. (To do
this right, we would create seams, unwrap the model, save the layout,
use a drawing program like Gimp to draw the texture, and then use that
texture. See previous Blender notes for more information on
texturing.)
Step 3: Rigging
Place the cursor in the middle of our character's chest. The easiest way to do this is first left-click on the middle of the character, and them press Num 1 or Num 3 to change views, and left-click again to get the cursor nicely centered in three dimensions.
Change to Object Mode, press space, and then select Add->Armature
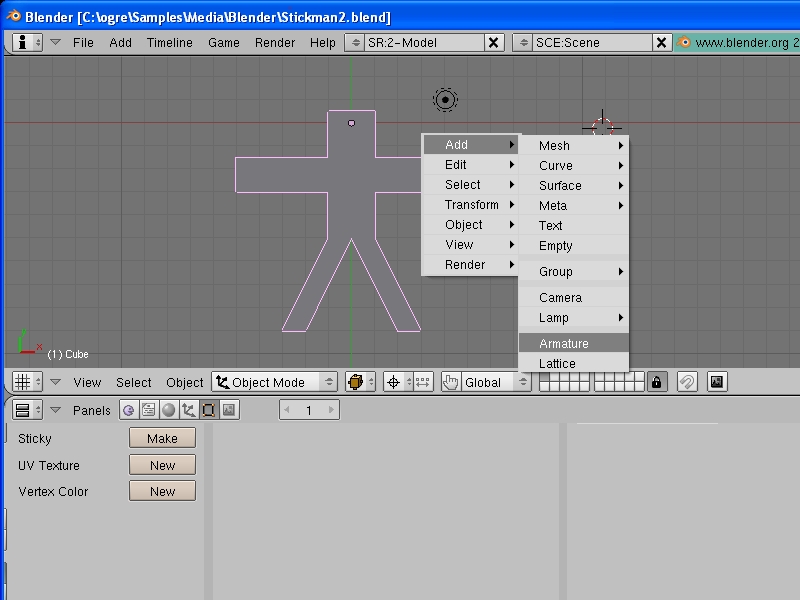
You should now have your first bone, represented as a wedge shape.
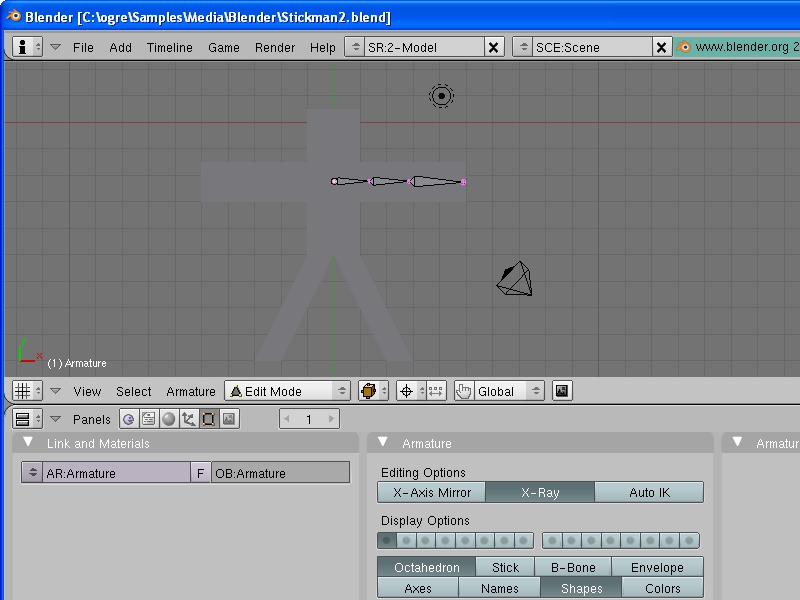
To make life easier, we want to be able to see bones inside of
models, so select the X-Ray button from the Armature section of the
button menu, and move the bone so that the pointy bit is right in the
middle of the chest (by moving the entire bone, both sides, -1 units in
the z direction)

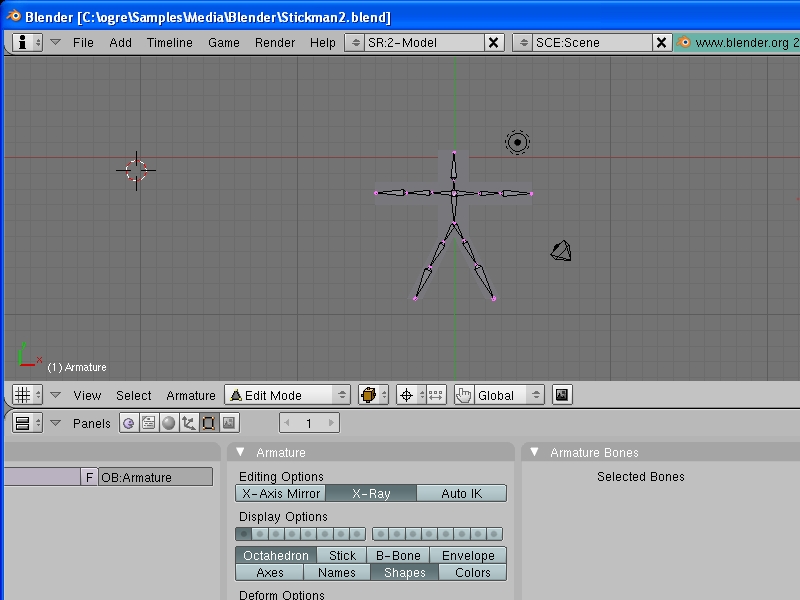
Be sure you are in edit mode, select the pointy-end of the bone, and press Num 7 to get a nice front view of the model. Press e to extrde a new bone, and using the mouse, move the endpoint of the bone near our objects's shoulder.

Extrude twice more, to get two more bones:
Then select the pointy end of the original bone (the one that is
perpendicular to the other bones), and extrude out a the other arm.
Once again starting from the original bone, extrude out a neck
and head. Finally, also starting from the original bone, extrude
out a spine, and from the spine extrude out bones for the hips and
legs. Always extrude from the pointy end of the bones, to make
them connect to each other properly. Now we should have the
entire skeleton:
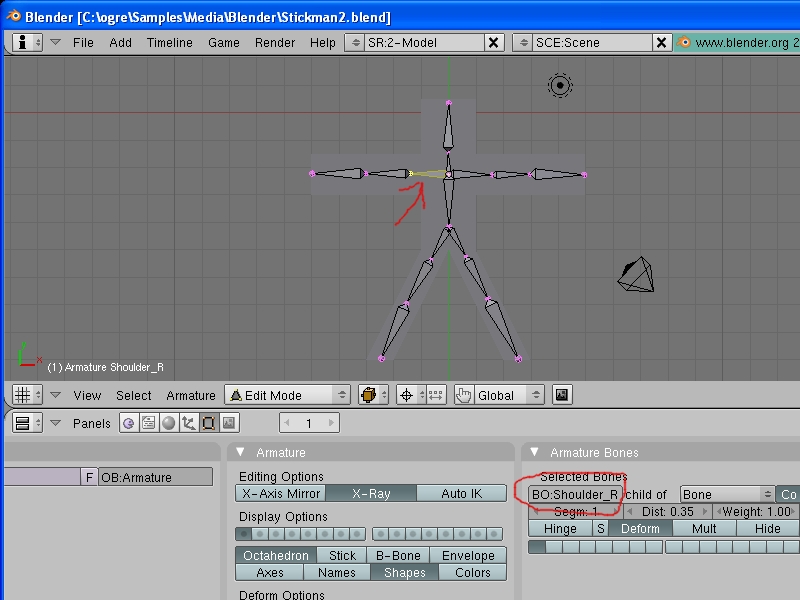
Next, we want to name bones. Select each bone (in edit mode), and give it an appropriate name
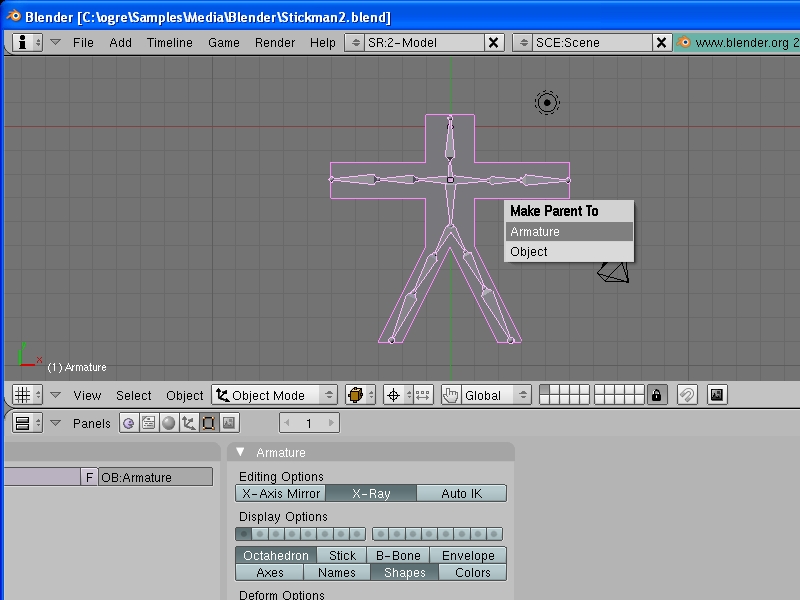
Now it's time to attach the skeleton to the model. Switch to object mode, select the model, then shift-select the armature (skeleton) and press ctrl-p, and select make parent to Armature
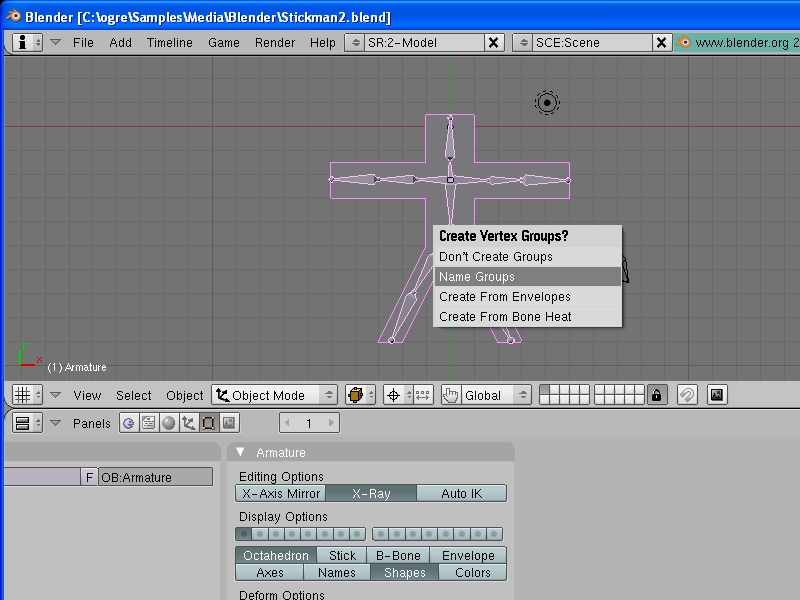
You will be given a second option -- create Name Groups.
(If you select Create from Bone Heat, then Blender will try to
figure out which bones go to which vertices by itself, but it doesn't
always do a good job, so we'll do that part manually)
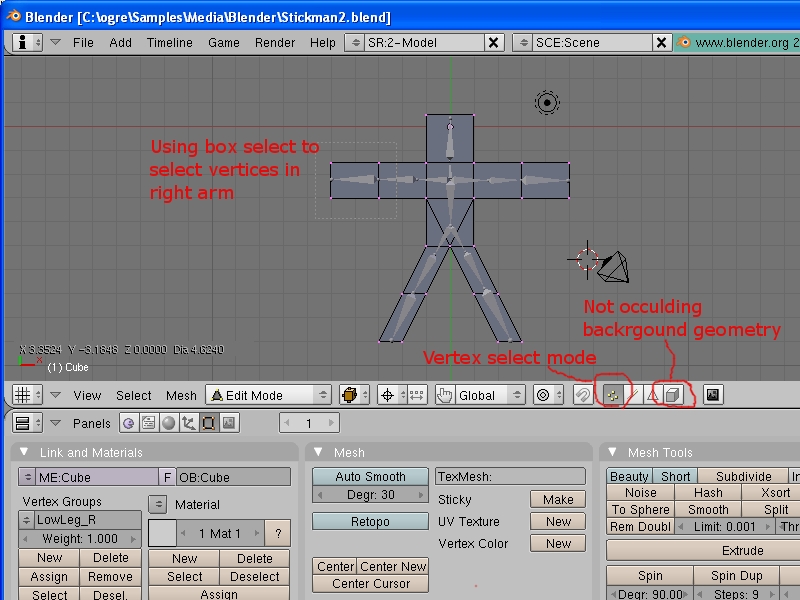
While in object mode, select the mesh (not the armature) and go to edit mode. Be sure you are in vertex select mode, and that you are not occluding background geometry. Press b to go into box select mode, and click and drag to select the vertices in the right arm:
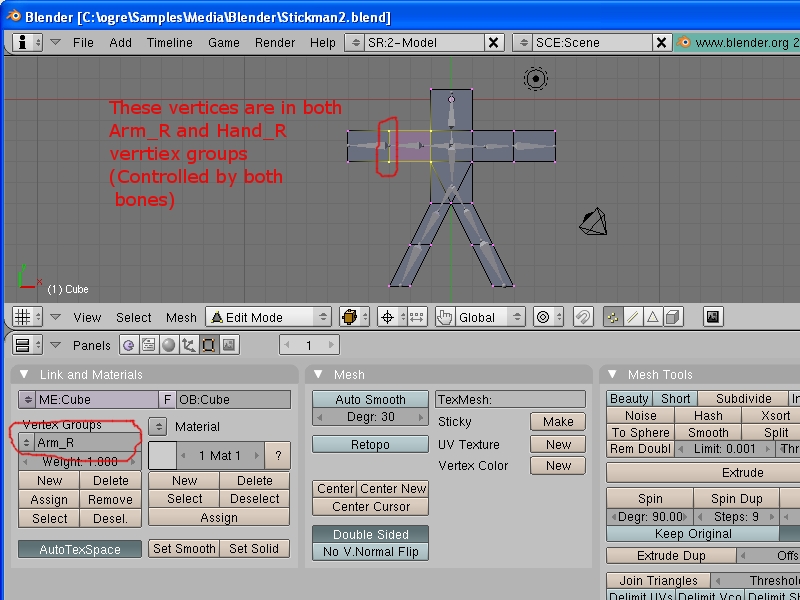
In the button menu, under Link and Materials / Vertex Groups, select the Hand_R group, and click assign.
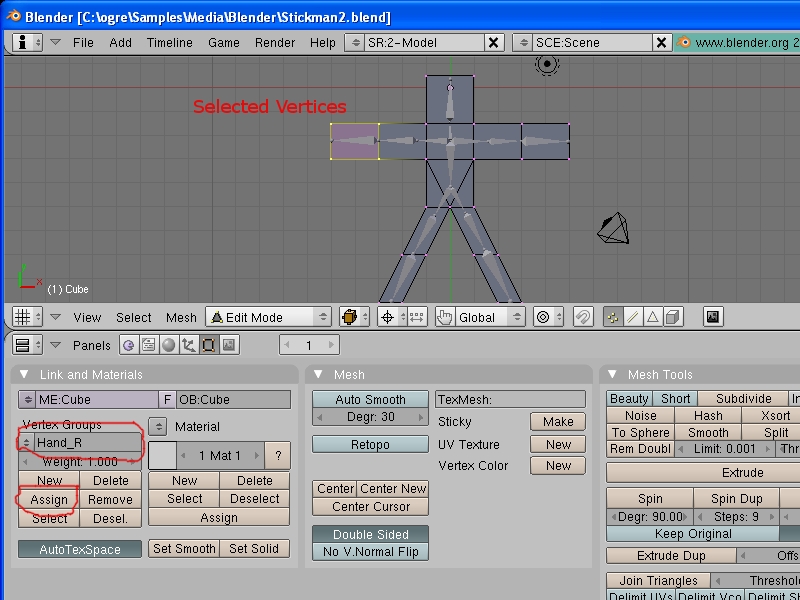
Next, select vertices in the right arm, and add them to the Arm_R
vertex group. Note that you can have vertcies in more than one group --
that just means that they will be controlled by more than one bone.
Once we have added all vertices to at least one vertex group (Ogre
complains if there are any vertices not assigned to any bone), we can
animate! Change to object mode, select the armature, and then change to Pose Mode. Select any bone, and move it around to see how the model changes.
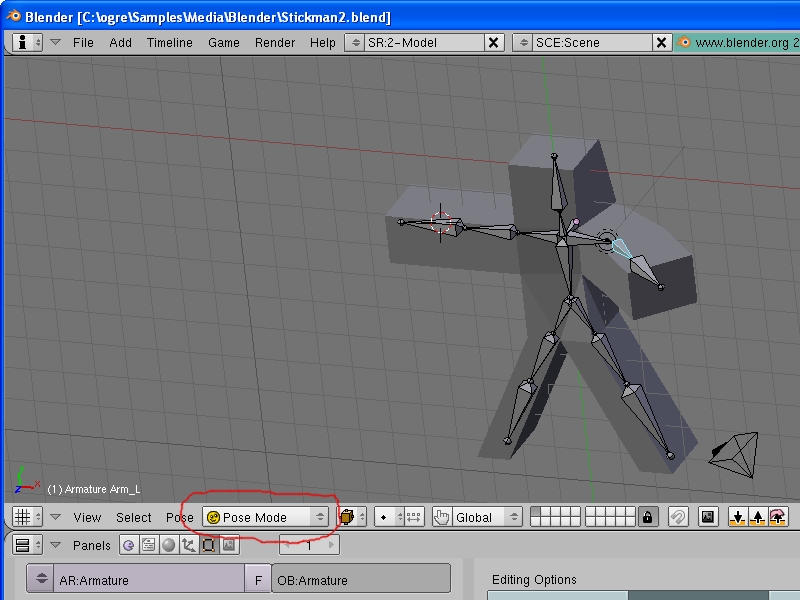
Move around the bones, and see how the model moves. If you have a
more complicated model, you might notice that it doesn't move quite how
you want. You may need to reassign verticies to different bones,
or change the armature a bit. For now, the simple rigging we have
will do just fine.
Step 4: Animating
Now we can animate. Make sure you are in Pose Mode. Set the frame number to 1, and pose your character in the first pose of a walk cycle. Select all bones (press a until all bones are blue), then press i
to insert a keyframe. Keyframes can save bone locations,
rotations, or scales. If you want the animation to actually move
the model, then you want to save the location and rotation. If
you just want to save the pose (so that the model will be moved around
by your game logic and not the animation), then you want to save the rotation. We will save both the Location and
Rotation, though we are only changing bone rotations and not positions
for this simple example.
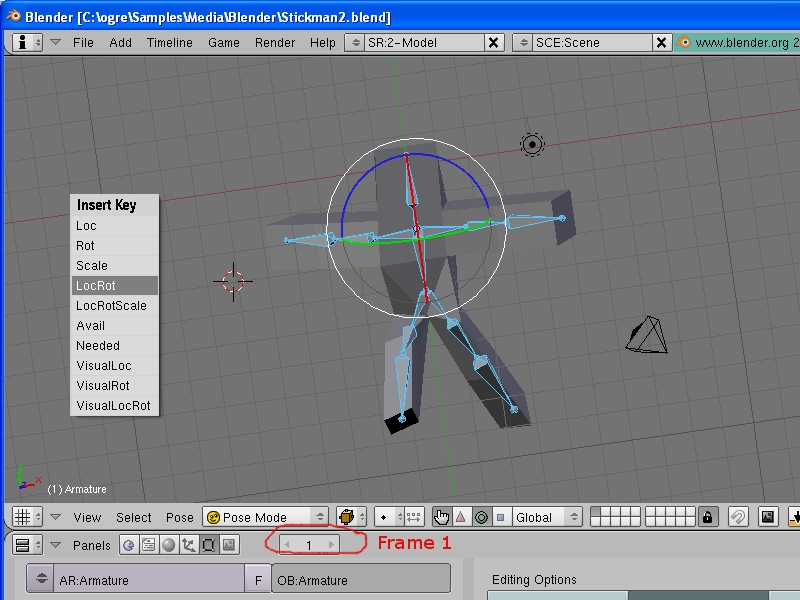
Set the keyframe to some larger number (say, 10), and pose the
character for how it should look in the middle of the walk cycle, and
insert another keyframe (using i).
Insert as many keyframes as you want (you can get a passable walk
cycle with just 4 keyframes). You can save youself some work by
using the buttons that copy the current pose to the buffer, and copy
the buffered pose to the current frame

You can create more animations, just start at larger keyframes (For
instance, animate a walk using 1-60, animate a jump using frames
61-113, animate a wave from frames 114-256, and so on.)
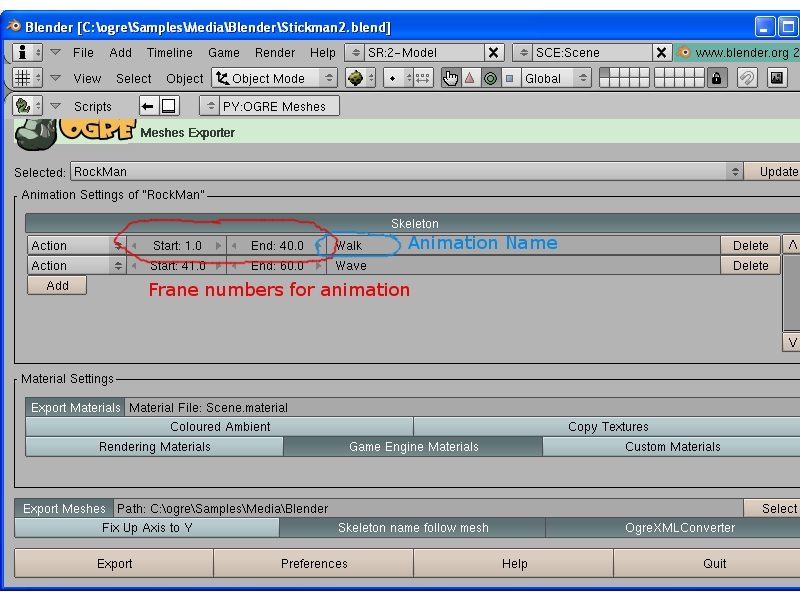
Once you have all of your animations done, it's time to export.
Before you export, change the name of the mesh to something
reasonable (in this example I used RockMan, since I used the rockwall
texture as a skin). Change to object mode,
and select the mesh. Do an OGRE meshes export. In the
skeleton menu, click on Add to add an animation, and give it starting
and ending frame numbers, and a name. Click on Add again to add a
second animation, with different starting and ending frames.
If at any point when creating the mesh, if you extruded a face without
moving the new extruded face, then the exporter will complain that some
faces are too small. Start moving vertices in your mesh to see if
two are on top of each other. If so, select those two vertices
and merge (alt m) them together
Step 5: Using Animation in Ogre
Once you have your meshes, skeleton, materials, and so on in folders
that Ogre can see, you can run your animation. In your ogre code,
when you set up your entity, you can make an animation active:
// Set up Ogre mesh / SceneNodes
Entity* man = mSceneMgr->createEntity("Man", "RockMan.mesh");
SceneNode* manNode =
mSceneMgr->getRootSceneNode()->createChildSceneNode();
manNode->attachObject(man);
// Enable the Walk animation for this entity, set it to loop, and set weight to 1.0
// (so the walk animation completely drives the mesh
man->getAnimationState("Walk")->setLoop(true);
man->getAnimationState("Walk")->setEnabled(true);
man->getAnimationState("Walk")->setWeight(1.0);
Now every frame you need to update the animation. Somewhere in your update code, update the animation as follows:
mSceneMgr->getEntity("Man")->getAnimationState("Walk")->addTime(evt.timeSinceLastFrame);
Of course, you can cache the entity pointer (or the animation state,
for that matter) so that you don't need to do a lookup every frame,
but the time hit is pretty small for doing a few hash table
lookups and pointer dereferences. You have more control over the
animation than just the addTime method -- take a look at the Ogre
header files (or, if you're feeling ambitious, the source code itself)
for more information.