Accessing Your Development Environment
Each student in CS 521 is assigned a virtual machine that gives them a full Linux-based development environment. There are two ways to access it:
- Via a web browser
- Through a secure shell (
ssh)
Web-based Access
To reach your development environment, visit:
Where USERNAME is your USF username. For example, my USF username is mmalensek.
Once there you can access your virtual machine in one of two ways: an online code editor powered by Visual Studio Code (https://segv.cloud/USERNAME/code), or through a UNIX terminal (https://segv.cloud/USERNAME/term).
This is probably the easiest mechanism to access your development environment. However, if you’d prefer to access it with local software, read on.
Local Access
Once again, there are two options to access your development environment using local applications: ssh, or an editor that supports remote access through ssh.
NOTE: if you need local access from home (i.e., not on campus) then you will need to email support@cs.usfca.edu and ask them to add your IP address to their allow list. Visit whatismyip.com to find your IP, and email it to CS support. Afterwards you’ll be able to log in from home. ALTERNATIVELY, you can set up the USF VPN to gain access to the campus network.
If you have a terminal emulator and ssh client installed, you can launch a secure shell connection to your virtual machine. Mac and Linux users will already have these tools installed, but Windows users may want to install Git for Windows or run Linux on Windows through WSL2. If you’re looking for a more IDE-like experience (like Eclipse, Intellij, etc.) then you may want to install Visual Studio Code – it includes a terminal and ssh client. It’s also a great place to start if you’re new to command line applications or the terminal.
Anyhow, to gain access to your VM over ssh, you will need to edit your ~/.ssh/config file – if it doesn’t already exist, create it. If you’re not familiar with editing files from the terminal, you can run:
nano ~/.ssh/config
to get a basic terminal text editor.
Add the following to the file:
Host 521-vm
    User USERNAME
    HostName hydra
    Port PORT22
    ProxyJump USERNAME@stargate.cs.usfca.edu
Replace USERNAME with your USF username (twice). Replace PORT with your CS 521 ID Number. For example, mine looks like:
Host 521-vm
    User mmalensek
    HostName hydra
    Port 10022
    ProxyJump mmalensek@stargate.cs.usfca.edu
You can also change 521-vm to something else if you’d prefer. Once you have this saved in your ssh configuration, you can run ssh 521-vm, enter your password, and log in!
Remote Editing
If you want to do remote editing with your favorite text editor, then you should still do the ssh setup outlined above. Then you’ll need to install a plugin that allows you to connect to your VM (check your editor’s documentation – some of them have remote editing built in!).
Let’s say your favorite editor is Visual Studio Code. Install its Remote SSH Plugin and configure it to connect to your VM by entering CMD+Shift+P (CTRL+Shift+P on Windows), choosing ‘Remote-SSH: Connect to Host’ and then selecting ‘521-vm’ from the list.
Visual Studio Code can actually open your ~/.ssh/config file directly for editing, making the steps above even easier.
One More Alternative: Tunneling
Your VM is buried inside the CS network, which unfortunately means you can’t just connect to it directly. However, once you have an ssh alias set up, you can easily forward connections from your local machine directly to the VM by creating an ssh tunnel.
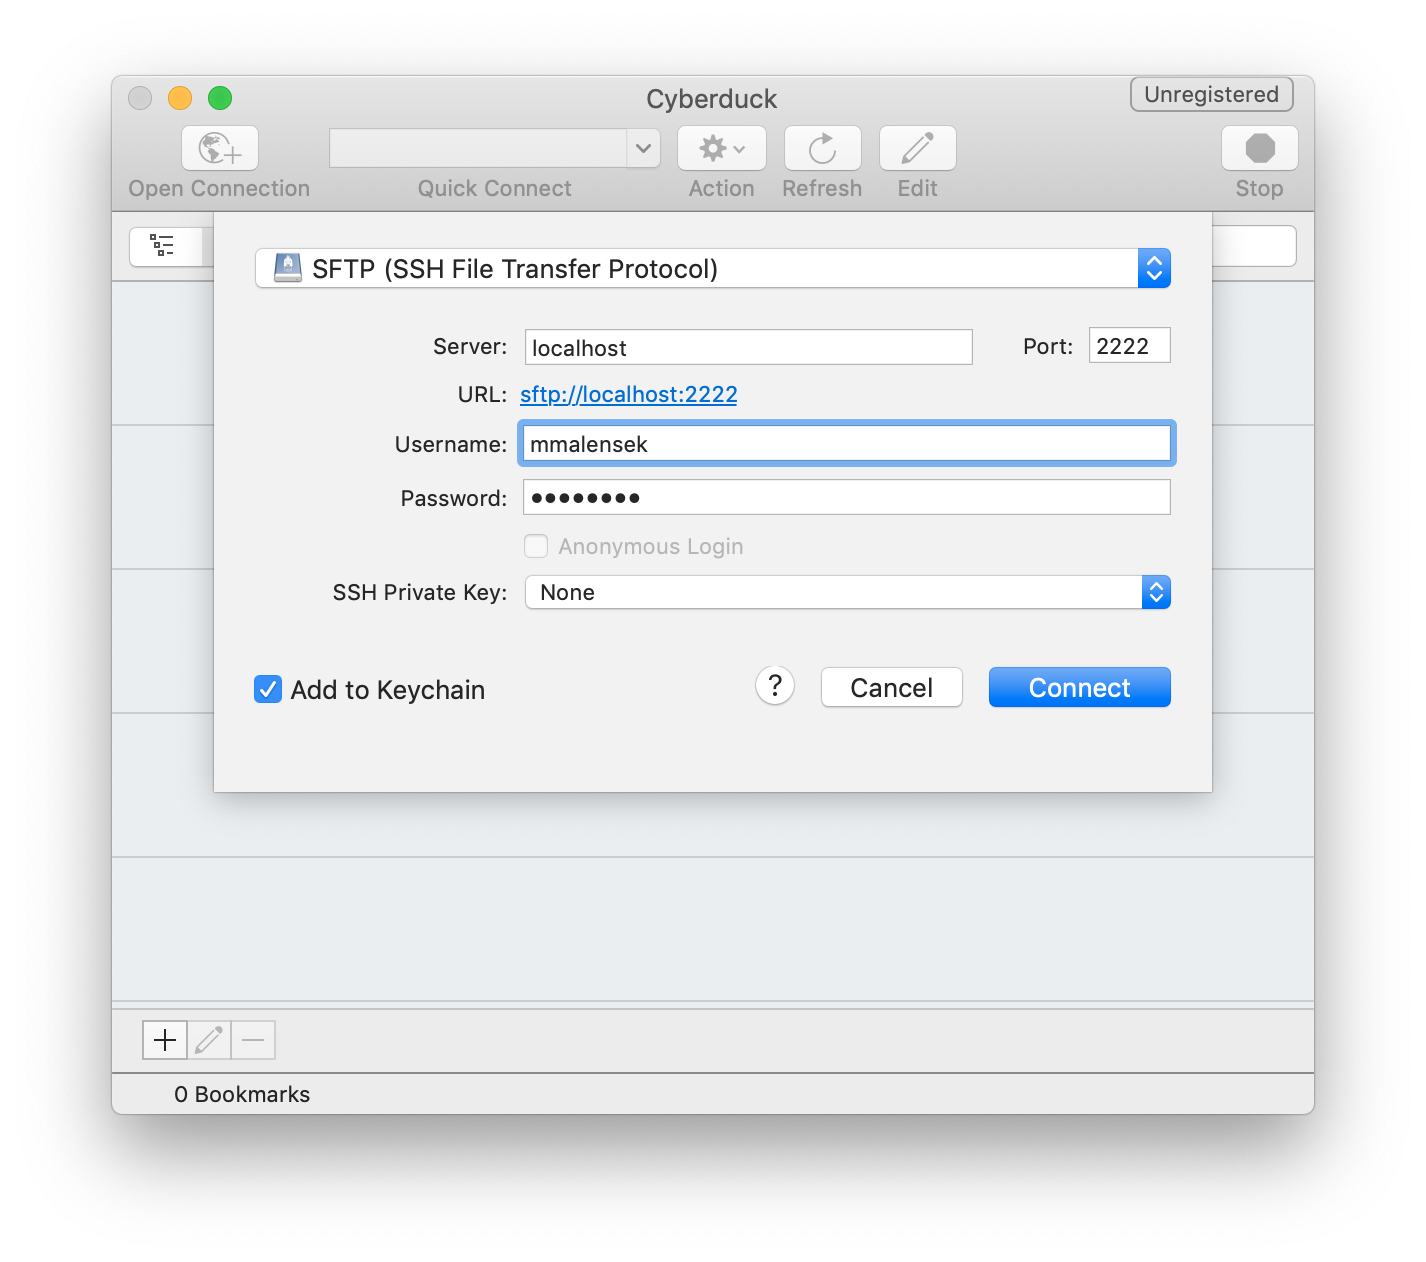
Let’s assume you want to use Cyberduck to transfer files. You can forward the VM’s ssh port to your local machine with the following command:
[matthew@silicon ~]$ ssh VMNAME -L PORT22:localhost:22 'echo Tunnel ready; cat'
(Replace PORT with your CS 521 id number as you did in the ssh setup).
You don’t actually need the last part ('echo ...; cat'), but this tells you that the tunnel is ready to go. Once you’ve done this, leave the terminal window running. Now, when configuring Cyberduck, you’ll enter localhost as the server and 2222 as the port. Cyberduck will think it’s connecting to your local development machine, but ssh is tunneling the connection through the network to your VM:
There are several file transfer options available on macOS, Linux, and Windows. Once you have an ssh tunnel active, these programs simply connect to localhost:2222 and work as they usually would with any other remote server. The best part is that most of these programs allow you to sync edits between the remote server and your favorite text editor. For instance, you can “edit” the file through your file transfer program using Sublime Text, VS Code, etc.
Cyberduck is one option that works for Mac and Windows users, but can be a bit buggy at times. Here are some alternatives:
- Termius (Cross-platform) – free for most use cases, works across all major desktop and phone operating systems.
- Transmit (macOS) – $$$, but very feature-rich.
- ForkLift (macOS) – Less expensive than Transmit and you can also use your ssh alias directly (without tunneling the connection first).
- WinSCP (Windows) – Free, supports syncing directories.
If you’re a Linux user, use your file manager to connect to a remote server and enter sftp://localhost:2222. Edit just like you would any other files/folders.